Thrifty Quilter Blocks & Patterns

So Many Ideas….

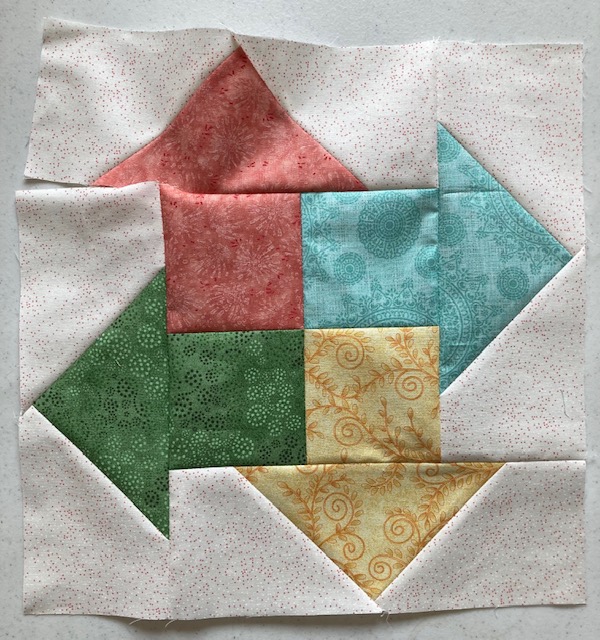
I don’t remember the last time I was bored, especially when it comes to quilting. I have more projects in various stages than I can remember, and more ideas in my brain and sketchbook than I’ll ever get around to making. It seems I spend a lot of time trying to decide what to work on next! So, this block idea sums me up pretty well, and to be honest, I thought it up in one of those moments when I was trying to decide which on-a-deadline project I would work on next.

“All Directions” is a 12″ finished block. For each block, you will need:

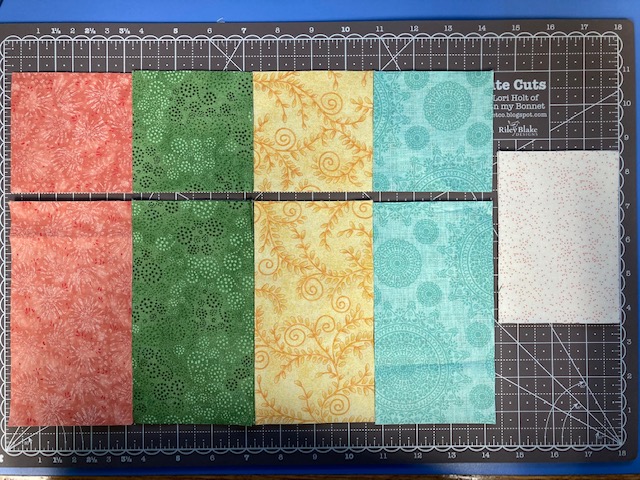
4 prints – one 3.5″ square and one 3.5″ x 6.5″ rectangle of each.

Background – eight 3.5″ x 5″ rectangles

To make this block, I also used the Creative GridsĀ® Folded Corner Clipper tool. It allows me to skip the step of marking a diagonal sewing line when making the “stitch-and-flip” flying geese. I don’t know that it saves much time, but I’m a gadget geek, so I had to get one. I like it, but if you’re not comfortable sewing bias edges, it may not be for you.

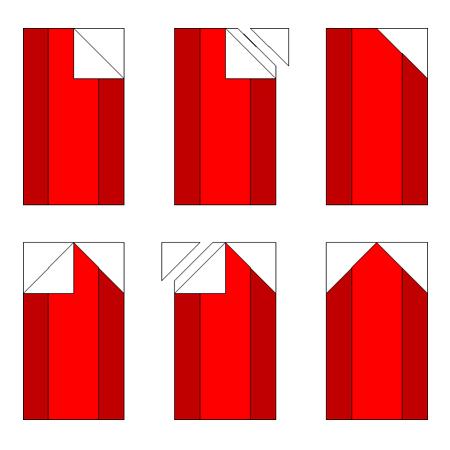
STEP 1: Make the Flying geese pieces

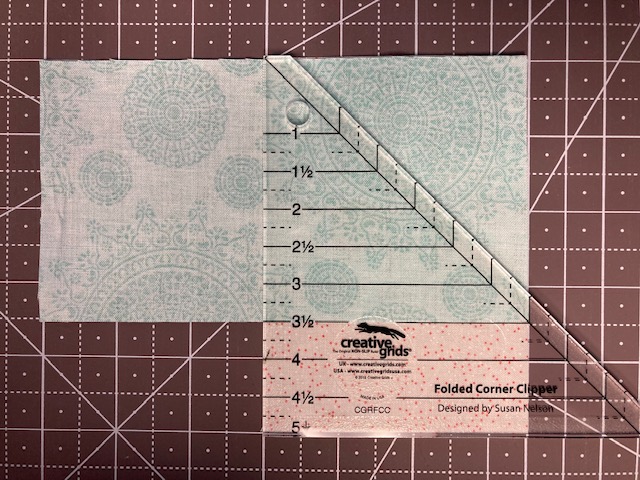
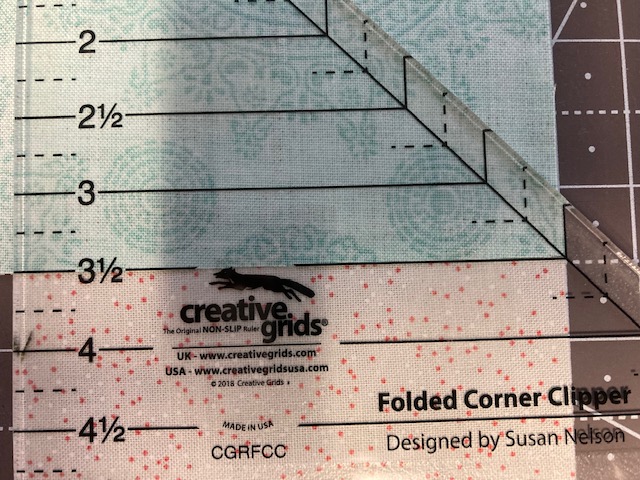
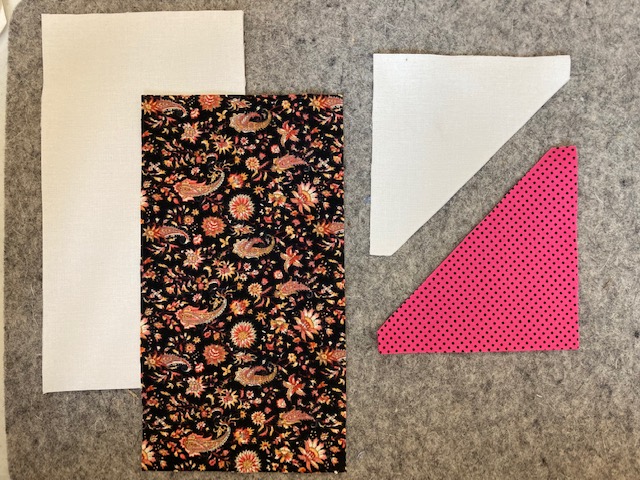
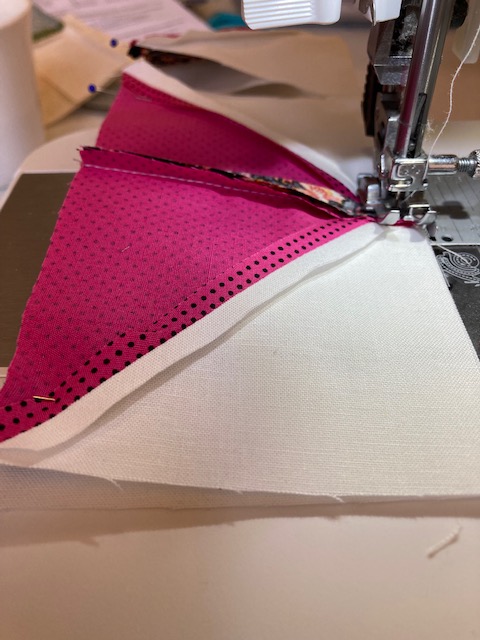
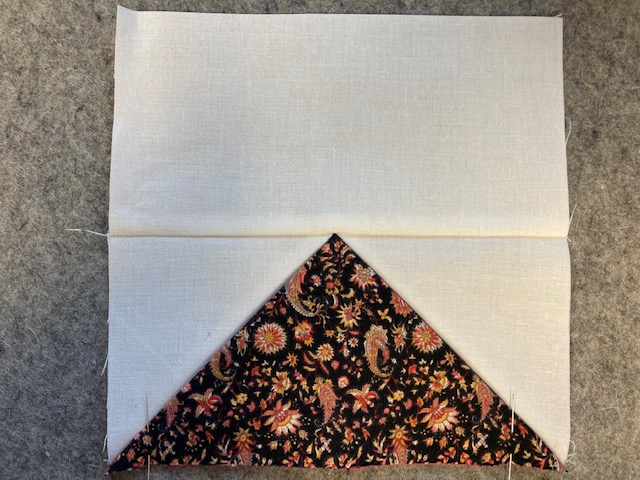
Lay a background strip down, face up and vertically. Lay a print rectangle face down and horizonally, as shown above. Align the top and right edges. Lay the tool on the corner area. Note that the 3.5″ line is along the bottom of the blue rectangle, and the corner fits into that little “hook” on the tool. Trim away the corner and sew the edge with a 1/4″ seam.

Open and press the seam. (The print rectangle probably won’t change color on you. )

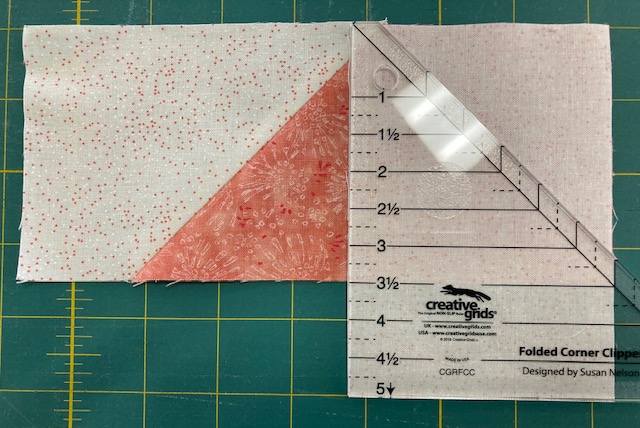
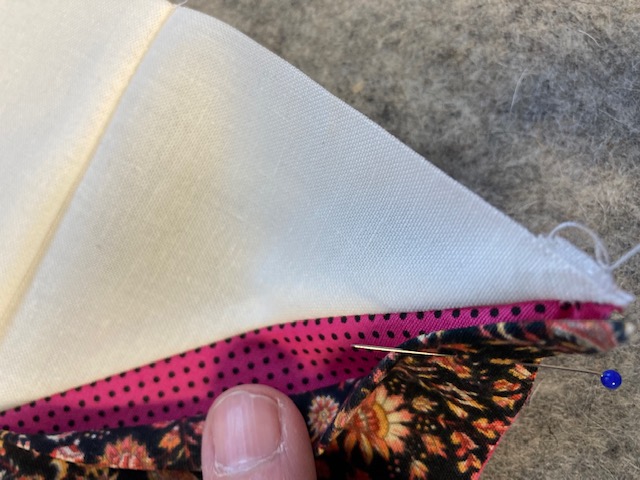
To do the other edge, lay the piece you just made right side up and horizontally, then lay a background rectangle face down and vertically, aligning the top and right corners again. Use the tool to trim away the corner, and sew the seam.

Repeat with all of your print and background rectangles.

STEP 2: Make the center 4-Patch.

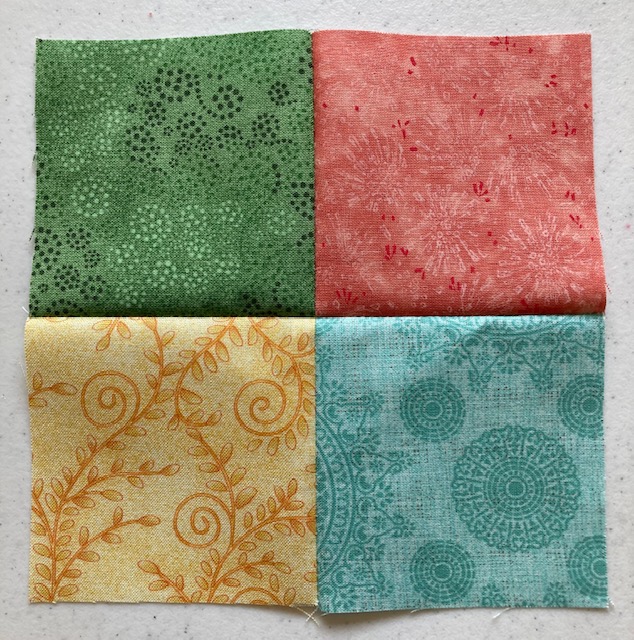
Use the 3.5″ print squares to make a 4-patch.

STEP 3: Here comes the fun part!

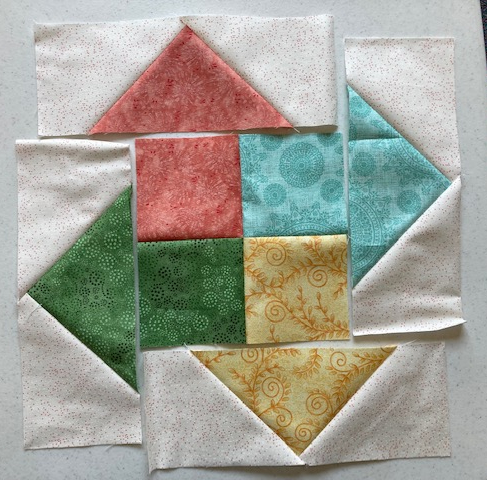
Lay the 4-Patch down, and lay the flying geese strips around it as shown, matching the prints. We’re going to use a partial seam technique to sew the strips to the 4-patch. It’s not hard, I promise.

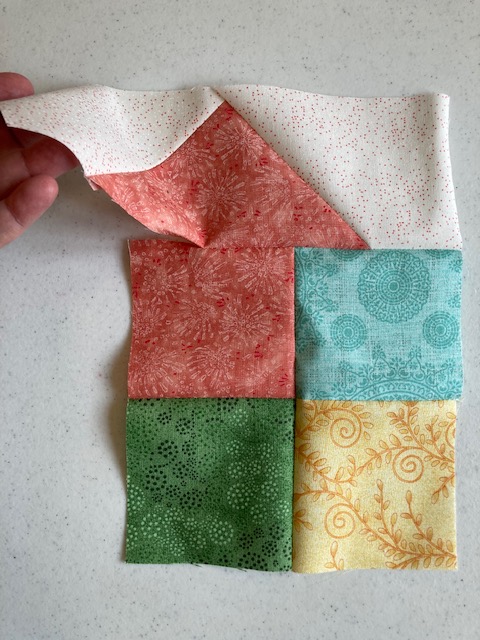
The whole secret is this first seam. Align the right edge of the pink flying geese strip with the right edge of the blue square. Starting at the right edge, sew the seam, STOPPING about an inch from the left edge of the pink square. We’ll just leave that end loose for the time being. Press just the blue/white section of that seam.

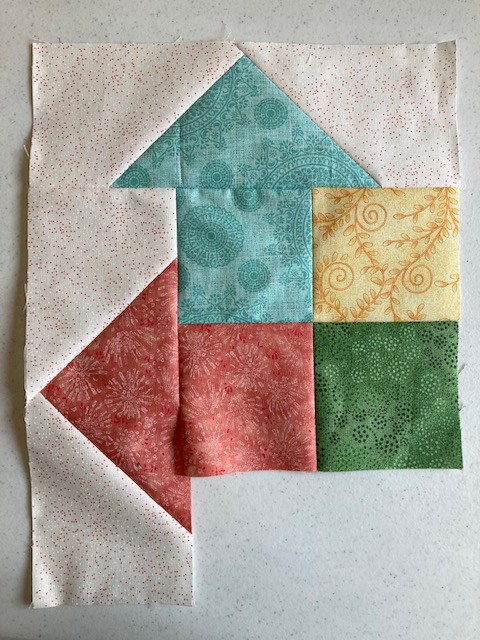
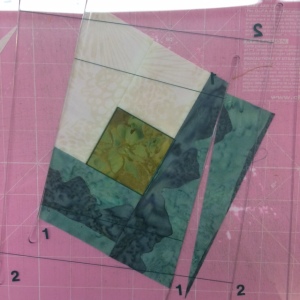
Now when you lay the blue geese strip on the block, you can sew the entire seam!

Repeat with the yellow and green geese strips. See where this is going? Now you can go back and finish sewing that first seam on the pink geese strip. Clever, yes? Note: It’s a good idea to overlap a few stitches when you sew that last seam.

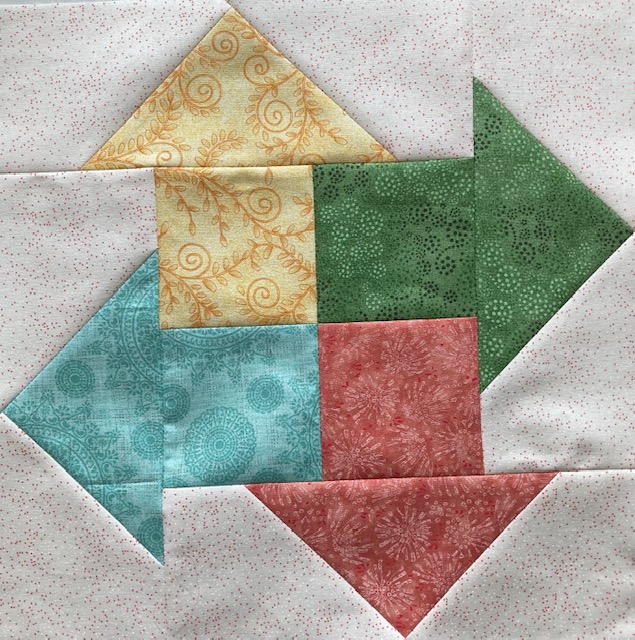
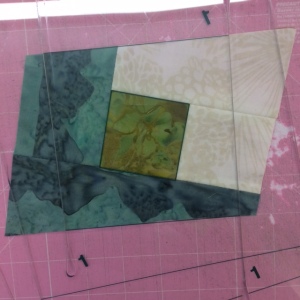
Give it a good pressing and you should have a 12.5″ “All Directions” block.

****************************************

If you like this block, feel free to share this post on social media, and please, click the “Follow” button at the top of the post to be notified whenever a new post goes live. It doesn’t happen as often as I would like, but there’s almost always a block or quilt pattern for you.

Meanwhile, check out my Facebook Page and Instagram (I’m still trying to get the hang of IG.)

Be watching for an upcoming blog post on Rolling Along a new title just published by Martingale Publishing, and featuring a dozen Jelly Roll quilt projects “baked up” by the Moda Bake Shop Chefs, including me. You might even win a free copy of the book!

Categories: 12" TQ Blocks, Other Blocks & Patterns, Random Blocks, Tools | Tags: , , | Leave a comment

Staycation Fun

My quilting buddy, Annette, has been preparing to do a presentation for our quilt guild on Dimensional Curved Piecing, a technique popularized by Annette Ornelas of Southwinds Designs. (Follow that link to visit her website and see the amazing patterns she has created.) But I digress.

Since I am on “staycation” this week, and I talked my friend Annette into doing the demonstration, I felt obliged to come up with a few samples for her. I’ve been toying with ways to use the DCP technique to “dress up” traditional quilt blocks.

Here’s what I have for you today.

To make this block, you will need:

Background: Four 3.5″ x 6.5″ rectangles, and eight 3.5″ half-square triangles. (I used my AccuQuilt cutter for this project)

Pink: Eight 3.5″ half-square triangles.

Brown: Four 3.5″ x 6.5″ rectangles.

STEP 1: Sew the pink and background triangles into squares. Fold a brown rectangle in half, wrong sides together.

Step 2: Sew the triangle squares as though you’re making a Flying Geese unit, catching the folded brown rectangle in the seam. The fold in the brown rectangle is at the top in these photos. Notice it does not extend into the seam allowance at the top of the piece.

Open the unit out, and open out the brown piece so it covers the pink triangles.

Pin the bottom corners as shown and press.

Step 3: Sew the 3.5″ x 6.5″ background rectangles to the top edge of the Flying Geese units.

You should have four units that look like this.

Step 4: Sew the units into a pinwheel.

The sides of the brown triangle will be loose, and because they are on the bias, you can gently roll them back into a curve. using a matching thread, carefully (slowly) topstitch the curved edge to hold the curve in place.

If you’re like me and do better with a live tutorial than with written instructions, watch this short video on the Southwind Designs YouTube channel.

I have a couple more ideas I’ll show you on my Facebook page, One is an adaptation of the Rocky Mountain block, and the other is a tweaked version of the block I showed you a few years back in the post “Controlling the Chaos.”

I’ve got some exciting news to share. A while back (like nearly a year and a half!) I was chosen to contribute a Jelly Roll pattern to a new book just published by Moda Fabrics and Martingale Publishing! It’s called Rolling Along designers are going to be giving away copies of the book over the next few weeks. I’ll have details for you soon. Meanwhile, you can probably find it at your local quilt shop.

Categories: 12" TQ Blocks, Uncategorized | Tags: , | Leave a comment

The Blooming 9-Patch

IMG_3690When working with the pre-cut scraps in my Thrifty Quilter system, I make a lot (a LOT) of Stitch-and-Flip corners. After thousands of of them, I was over drawing that diagonal line. One day I discovered I could layer the pieces, put my ruler down with the 1/4″ line on the diagonal points, cut that triangle away, then sew the seam and press the corner open.

Then Doug Leko of Antler Quilt Design came out with a new tool he calls the Mini Simple Folded Corners. First, it’s a new gadget, and I am a gadget geek. Second, it resembles a tool idea that was simmering in the back of my mind. So, I bought one, and decided this 10″ block I call the Blooming 9-Patch would be a perfect block to demonstrate it.

IMG_3684
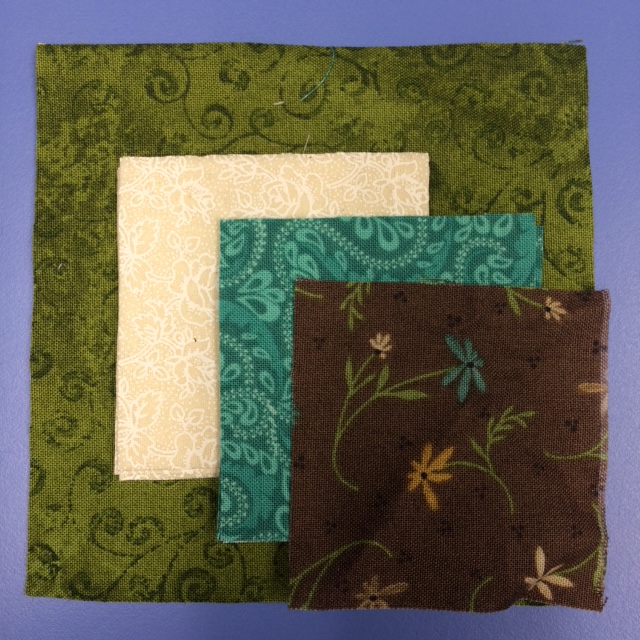
For each Blooming 9-Patch, you will need:

Four 4.5″ green squares

Eight 2.5″ beige squares

Four 2.5″ teal squares

One 2.5″ brown square


Step 1- Use the Stitch and Flip method to put a 2.5″ beige triangle corner on each of the 4.5″ green squares. I laid the beige square on the corner of the green square, then laid the tool down so that the 2.5″ lines lined up with the left and bottom edges of the beige square, and the printed diagonal line (which indicates my seam line) ran diagonally from the upper left to lower right corners. I cut away that triangle, sewed the seam and pressed the corner open. Again, this is not the way the tool was designed to work, but it worked for this block.

Step 2 –Ā  Sew the 2.5″ teal squares to the remaining 2.5″ beige squares.

Step 3 – Sew two rows with a teal/beige pair sandwiched between two green/white squares. Sew the other teal/white pairs into a strip with the brown square between the two teal squares.


Cropped block

Step 4 – Sew the row of squares between the other two rows to complete your Blooming 9-Patch block!

The block, unfinished, measures 10.5″ x 10.5″. I have a plan for it in my sketch book, which should make use of a layer cake I have left over from my stint as an Island Batik Ambassador.Ā  It’s on my To-Do list, but a ways down the list right now.

I have a classic block coming up next here on Seams Like a Plan.


Categories: 10" Squares, 10" TQ Blocks, The Thrifty Quilter System, Thrifty Quilter Blocks & Patterns, Tools, Uncategorized | 1 Comment

Rama-Llama-Boo-Boo :0/

My go-to high school graduation gift is a pillowcase. It’s easy to make, and you can customize it for the recipient. (I like to point out that it also makes a good laundry bag.) When a co-worker’s daughter graduated last spring, she had already decided she was going to decorate her dorm room in llamas and turquoise. I was tickled when I found the perfect llama print.

I had enough left from the pillowcase to add a few 6.5″ squares to my Thrifty Quilter bin. At a recent retreat weekend, I played with an idea for a 10″ quilt block. That explains the first part of this post’s title. The rest will be clear shortly.

IMG_3493
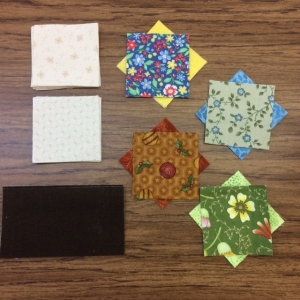
Here are the TQ pieces needed for this block:

One 6.5″ square Novelty Print

*Two 3.5″ turquoise squares

*Six 3.5″ brown squares

*Eight 3.5″ white squares


Step 1:

img_3532.jpg

Cut two 3.5″ brown squares and two 3.5″ white squares diagonally twice, and sew into four quarter-square triangles (QSTs). Trim each one to 2.5″ square.Ā  Unaffiliated endorsement: If you don’t have one, get yourself a Tucker TrimmerĀ®. If your local shop doesn’t carry them, you can order direct from Studio 180 Designs.Ā 


Step 2:

IMG_3531 (1)IMG_3530
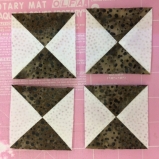
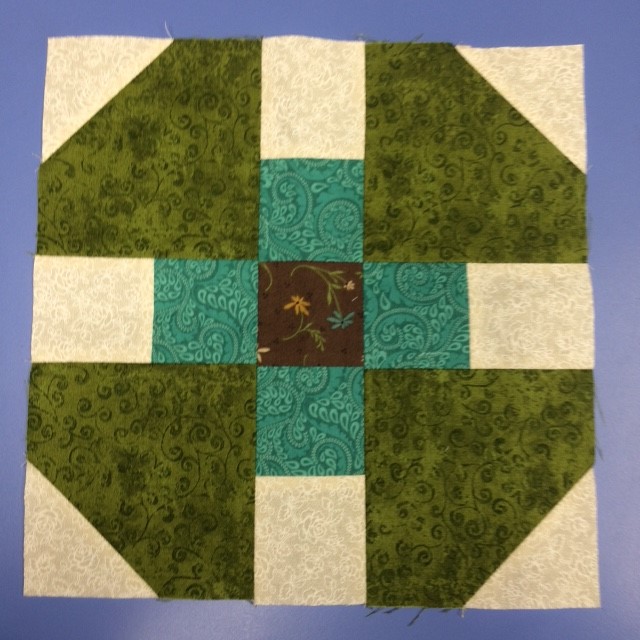
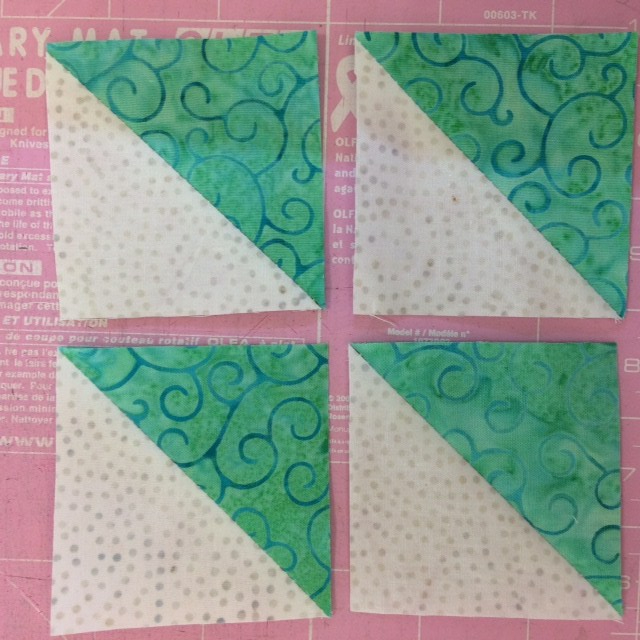
Cut the remaining brown squares, white squares and the turquoise squares in half diagonally. Sew into eight brown and white half-square triangles (HSTs) and four turquoise and white HSTs. Trim each to 2.5″.


Step 3:

IMG_3533
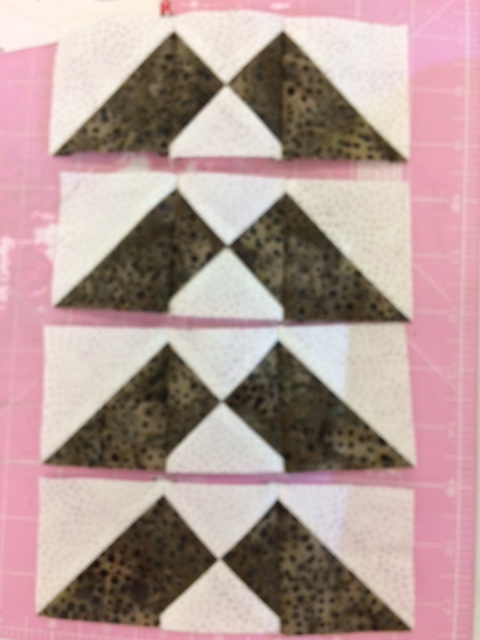
Sew a brown and white HST to the brown sides of each QST as shown.

Just so you know, this is where I made my boo-boo. We’ll see if you can figure out what I did.

Hint: I did steps 1 & 2 on one day, and step 3 a few weeks later.


Step 4:

Sew a strip to the left and right sides of the 6.5″ novelty square. Sew the turquoise and white squares to the ends of the other two brown and white strips, and sew these to the top and bottom of the center unit to complete your block.

IMG_3534

“Corral” – 2019

So now you see my mistake.Ā  Actually, it’s an honest mistake that I made worse by not addressing it immediately.

Here’s what happened:

I was using a machine that has a little quirk. Even though I have a quarter-inch presser foot, I still have to move the needle three positions to the left to have a true quarter-inch seam. Of course, I turned the machine off at the end of the first day of the retreat, having finished Step 2. When I switched the machine on the next time, the machine went to its default settings, and I forgot to bump the needle over before beginning Step 3.Ā  That was my first mistake.

When I sewed strip to the left side of the llama square, I noticed that it didn’t fit. I should have unsewn that seam, measured the strip and figured out why it was too long. (Because I didn’t move the needle, my seams when sewing the HSTs to the QSTs were too narrow.)Ā  That was my second mistake.

Instead of addressing the problem, I told myself “it won’t be that noticeable”, and simply trimmed the end off flush with the larger square. That’s was my third mistake, and for this block, the fatal error.Ā  I know better than that! For pity sake, I’ve been doing this for over 40 years. I have no excuse.

I will forgive my quilty friends if they snicker when I say, I am not a “point prude.” I know all quilters are human, and imperfect points happen to us all, but this one will haunt me for a while.

Live and learn.


Categories: 10" Squares, 10" TQ Blocks, Thrifty Quilter Blocks & Patterns, Tucket Trimmer (Studio 180 Designs), Uncategorized | 2 Comments

O, Scrap!

Try It!For the Island Batik Ambassadors “Try It” Challenge, I’m pleased to share a technique for making half-square triangles (HSTs).Ā  I wish I had thought of it, but all of the credit goes to Beth Helfter of
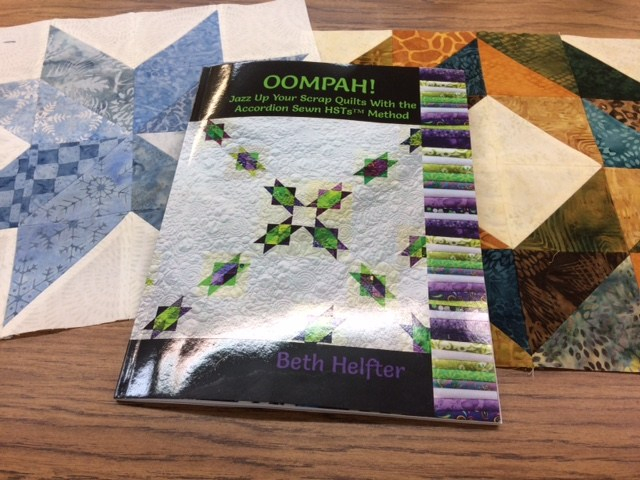
 EvaPaige Quilt Designs. I honestly cannot recall how our quilting paths first crossed, but we are both former members of the Quiltmaker Magazine “Scrap Squad” and both of us have more or less built our design careers around scrap quilts.

IMG_2872

The blue star block is in the book. The gold block is not.

The most common way of making HST units is to begin with two squares, draw a diagonal line on one, sew 1/4″ on both sides of the line then cut on the drawn line. This gives you a pair of identical HSTs. But Beth wanted each HST in her project to be unique. She could have just cut all of the squares diagonally and mixed them up, but then she’d be dealing with all of those bias edges. Her solution is nothing short of genius. She calls it Accordion-Sewn HSTs. She even wrote a book about it!

Because this is Beth’s technique, and because it’s one that’s easier to understand if you see it done, I encourage you to take a few minutes to watch her tutorial videos:

PART 1

PART 2

PART 3

I was intrigued, so I ordered the book and whipped up a quick star block. That’s all it took, and I was hooked…and looking for other scrap blocks I could use the accordion technique on. The first one I came up with was the “O, Scrap!” block.


I should note that all of the scrap fabrics used in this post are Island Batik prints.

I really like that blue star block from Beth’s book, but I don’t like the big “blank” space you get when you set the blocks side-by-side.Ā  I decided to try to add dark triangles in the corners. The challenge with this block, which I called “O, My Stars”, was figuring out how to stack my squares so I’d wind up with the specific combinations I needed.


I have big plans for that block, so I cut a mess of my Island Batik scraps into 4.5″ squares with my AccuQuilt Go! die cutter. It’s going to be an ongoing scrap project for a while, though, because I got another bright idea.

I had most of a 10″ stack of the Island Batik “Lavendula” collection left over from my February miniature quilt project, so I cut all of those squares into 5″ squares and made a modern-style lap-size quilt .


I made three 16″ “Oh, Scrap!” blocks. I considered renaming the larger block “The Big O”, but chickened out. Beth would’ve done it. I also made two extra side strips.Ā  I sewed the blocks and extra strips into one long row, then added a 16.5″ wide strip across the top and a 40.5″ wide strip on the bottom. The result will be a 56″ x 72″ scrap quilt.Ā  The binding will be either teal (more likely) or purple.

O Scrap - Title

All fabrics in this post were supplied by Island Batik Ambassador sponsors. The project is sewn with Aurifil thread, and the batting is Hobbs Heirloom Cotton blend.Ā  AccuQuilt has GO! dies for both the 4.5″ and 5″ squares I used in thisĀ  project.

Have I convinced you to try the Accordion HST technique? You’ll want to order your very own copy of Oompah!Ā or the technique sheetĀ from EvaPage Quilt Designs. You may want to check out her Facebook page as well. Do me a favor and tell Beth you heard about it here on Seams Like a Plan. Pretty please?


Categories: 12" TQ Blocks, AccuQuilt, Aurifil Threads, Hobbs Batting, Island Batik Ambassador, Island Batik Fabric, Oversize Blocks, Quilts, Quilts, Scrap Quilts, Uncategorized | 3 Comments

Thank You for Your Service

FreedomThis week the United States celebrate Independence Day, our neighbors celebrate Canada Day, and the Island Batik Ambassadors celebrate the release of the Freedom collection with a Quilts of Valor Blog Hop.

I’ve designed this 56″ x 72″ lap quilt using the AccuQuilt 8″ Qube die set. AccuQuilt is a sponsor of the Island Batik Ambassadors program for 2019.

Fabric for the “Service Star” quilt was provided by Island Batik, batting by Hobbs, and thread by Aurifil.

Thank you to my BQB (Best Quilting Buddy) Annette Freeland for sewing the top for me while I was off teaching a class at Chatcolab in Idaho!

These are the fabrics we used in “Service Star”:

That white space in the upper right corner of the mosaic is actually a photo of a solid white batik.

I won’t list the yardages here, or go into detail on the construction of the quilt. That’s all included in the pattern. Here are the highlights, though:

IMG_3216

The pattern uses six of the eight dies in the Qube – the 4.5″ and 2.5″ squares, 2.5″ half square triangles, 4.5″ quarter square triangles, 3.25 on-point square, and 2.5″ x 4.5″ rectangle.

There are also 1.5″, 2.5″ and 4.5″ wide strips. Happily, AccuQuilt makes strip dies in those widths.

The three star blocks are made with a square-in-a-square, flying geese,Ā  and an “L” unit, made with two squares and a rectangle.

QOV 2019-Strip Points

The only part of this quilt that couldn’t be pre-cut with the Accuquilt is the 4.5″ triangles that make the points on the red stripsets. I did this (Well, Annette did it, but I told her to) with the stitch and flip method.


QOV 2019-Exploded Quilt


The quilt is constructed in vertical rows.

Once it’s quilted, I’ll bind “Service Star” in the same navy blue batik we used in the star blocks.

If you use the pattern to make your own Service Star quilt, I’d love to see a photo. You can email me at sweetgrassdesigns@yahoo.com.

Click IB- 2019 QOV to download the PDF pattern.


Check out these blogs for more Quilts of Valor, featuring Island Batiks:

July 1
Becca Fenstermaker — Pretty Piney
Denise Looney — For the Love of Geese
Gail Sheppard — Quilting Gail
July 2
Pamela Boatright — Pamela Quilts
Anne Wiens — Sweetgrass Designs
July 3
Bea Lee —Bea Quilter
Carla Henton — Creatin’ In the Sticks
July 4
Emily Leachman — The Darling Dogwood
Joan Kawano — MooseStash Quilting
Jen Strauser – Dizzy Quilter
July 5
Steph Jacobson — Steph Jacobsen Designs
Leah Malasky — Quilted Delights
Anja Clyke — Anja Quilts
Maryellen McAuliffe — Mary Mack Made Mine

Categories: 12" TQ Blocks, AccuQuilt, Aurifil Threads, Hobbs Batting, Island Batik Ambassador, Island Batik Fabric, Quilts | 15 Comments

The 4 Sisters

Vintage Reimagined
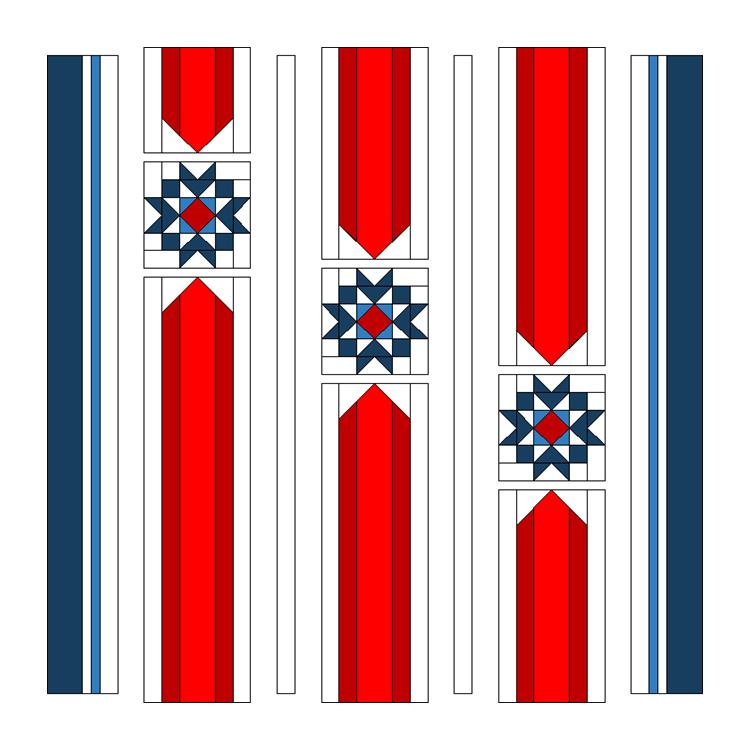
The March challenge for the Island Batik Ambassadors was “Vintage Reimagined.” We were asked to design a project inspired by a vintage quilt.

Adamson
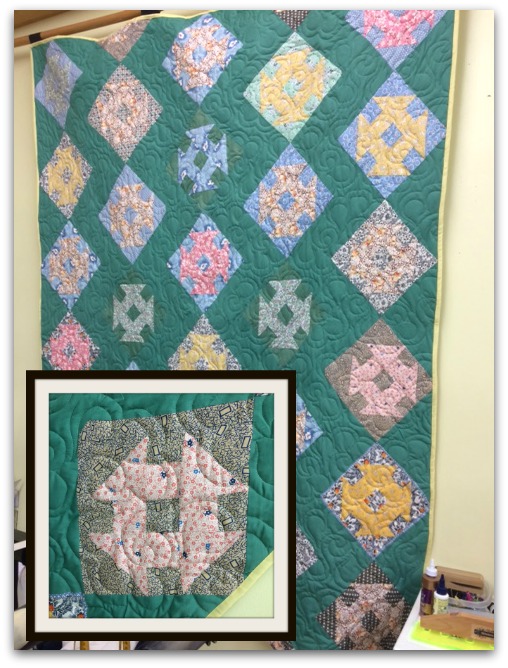
The quilt I chose as inspiration is a top pieced decades ago by Tilda Adamson, the grandmother of my friend Art Adamson.

This Depression-era quilt features the Churn Dash or Monkey Wrench block, and has several interesting elements going for it. I like the way the on-point rows are staggered, and I find those blocks with the green background that fades into the green sashing very intriguing. But what really caught my attention, and served as my design inspiration, was that one pink-on-brown block on the right edge of the quilt (and in the inset).

The way the pink churn dash is pushed off to the corner of the block reminded me of a story I heard in the late 1980s, when I helped a local museum with an oral history project leading up to the Montana statehood centennial.

Fabric Stack
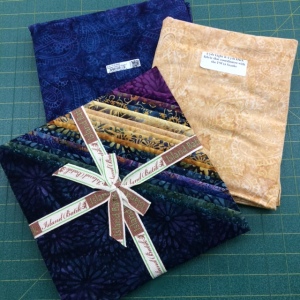
For my project, I used the Island Batik “Twilight Chic” collection. I had a stack of 40 10″ squares, plus 2 yards each of a dark blue and wheat-gold coordinate, all supplied by Island Batik.

The story I had heard was that of four sisters who homesteaded about 25 miles from where I live, in north central Montana.

To deter speculators, the government required each homesteader to build a house on their land, and they could not be away from their property for more than a couple of weeks at a stretch.

The homesteaders’ dream became a nightmare for many, as they dealt with harsh winters, droughts, prairie fires, and a host of other dangers.

For the sake of companionship and safety, the four sisters built their cabins in the corners of their homesteads, where their property met. Thus, they could all stay together at night, moving from cabin to cabin every few days, so none of them was absent from her property for more than the allowed time.

4 Sisters - Title

The fabrics used in my 4-Sisters quilt were supplied by Island Batik. I used HeirloomĀ­Ā­ batting supplied by Hobbs, and Aurifil threads for piecing and quilting.

To see what my fellow Island Batik Ambassadors have come up with this month, check their blogs:

2019 Island Batik Ambassadors

Carolina Asmussen ~Carolina Asmussen

Gene Black ~ Gene Black

Pamela Boatright ~ Pamela Quilts

Connie K Campbell ~ Freemotion by the River

Anja Clyke ~ Anja Quilts

Tina Dillard ~ Quilting Affection Designs

Becca Fenstermaker ~Pretty Piney

Jennifer Fulton ~ Inquiring Quilter

Barbara Gaddy ~ Bejeweled Quilts by Barb

Dione Gardner-Stephen ~ Clever Chameleon

Sarah Goer ~ Sarah Goer Quilts

Vasudha Govindan ~ Storied Quilts

Lori Haase ~ Dakota City Quilter II

Joanne Hart ~

Mania (Magdalini) Hatziioannidi ~ Mania for Quilts

Carla Henton ~ Create in the Sticks

Stephanie Jacobson ~ Steph Jacobson Designs

Connie Kauffman ~ Kauffman Designs

Joan Kawano ~ Moosestash Quilting

Kim Lapacek ~ Persimon Dreams

Emily Leachman ~ The Darling Dogwood

Leanne Parsons ~ Devoted Quilter

Bea Lee ~ BeaQuilter

Toby Lischko ~ Gateway Quilts & Stuff

Bill Locke ~

Denise Looney ~ For the Love of Geese

Leah Malasky ~ Quilted Delights

Sally Manke ~ Sally Manke

Maryellen McAuliffe ~ Mary Mackā€™s Blog

Kathleen McCormick ~ Kathleen McMusing

Carol Moellers ~ Carol Moellers Designs

Karen Neary ~ Sew Karen-ly Created

Lisa Nielsen ~ Lisa Lisa and the Quilt Jam

Jackie Oā€™Brien ~ If These Threads Could Talk

Laura Piland ~ Slice of Pi Quilts

Michelle Roberts ~ Creative Blonde

Vicki Schlimmer ~ Vickiā€™s Crafts and Quilting

Gail Sheppard ~ Quilting Gail

Sherry Shish ~ Powered by Quilting

Anita Skjellanger , Quilt in a not-Shell

Laticia ā€œTishā€ Stemple ~ Tishā€™s Adventures in Wonderland

Jennifer Strauser ~ Dizzy Quilter

Jennifer Thomas ~ Curlicue Creations

Terri Vanden Bosch ~ Lizard Creek Quilts

Alison Vermilya ~ Little Bunny Quilts

Sandra Walker ~ mmm! quilts

Suzy Webster ~ Adventerous Applique and Quilting

Anne Wiens ~ Sweetgrass Creative Designs

Geraldine Wilkins ~ Living Water Quilter

Janet Yamamoto ~

Categories: 10" Squares, 12" TQ Blocks, AccuQuilt, Aurifil Threads, Hobbs Batting, Island Batik Ambassador, Island Batik Fabric, Quilts, Uncategorized | 9 Comments

A Wonky Finish to 2018

47573370_2462874177088561_8211325820333981696_n
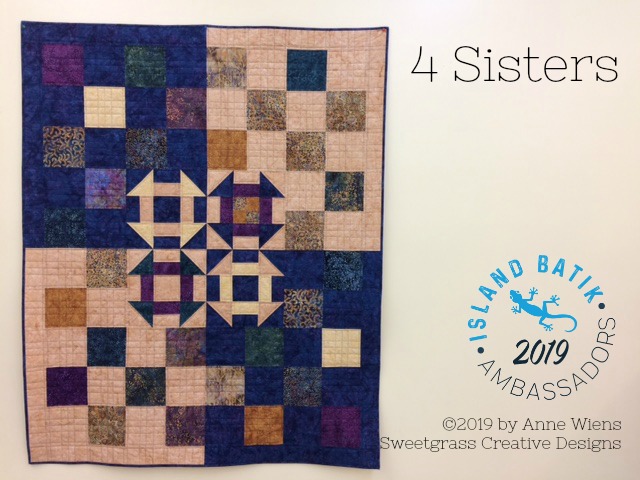
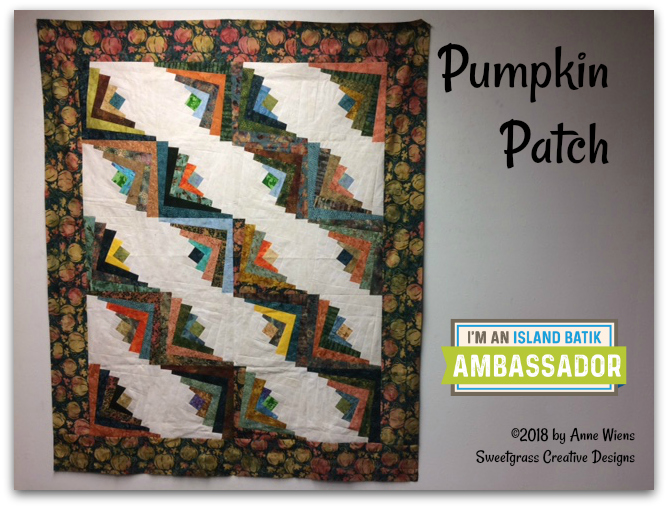
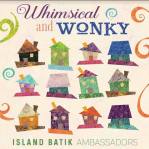
Our final Island Batik Ambassadors challenge for the 2018 calendar year was to make a project that is whimsical and/or wonky. Well, it’s been that kind of year, so wonky it is. 2040_LG_1489020424That and the fact that I have this Wonky Log Cabin tool from Quilt in a Day that I have been dying to play with! There are three patterns available, and I chose to try the one that comes with the ruler. It’s the closest to a traditional Log Cabin block.

Before I continue, a word from our sponsors: All fabrics used in this quilt top are supplied by Island Batik, the thread is a 40wt 100% cotton from Aurifil, and while the top hasn’t been quilted yet, I will use a Hobbs Heirloom batting.

28685323_1976685445707439_8475221276858777600_n
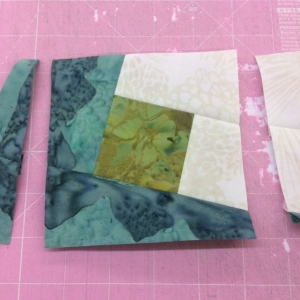
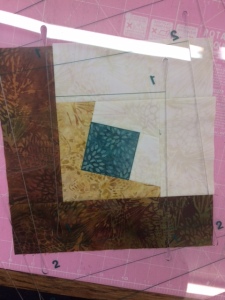
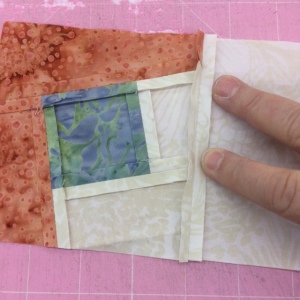
The Wonky Log Cabin pattern calls for 2.5″ strips of fabric to build the blocks.Ā  I had quite a few strips from the Vintage Morris collection left over from my Moonflower Cottage quilt, and some smaller scraps from the Northern Woods collection that I used for Guiding Star, but not nearly enough to make the twenty blocks I would need for this project, so I picked up a strip pack from Island Batik’s “Pumpkin Patch” line at my local quilt shop. The background fabric is an off-white from Northern Woods, and the border fabric is from the Pumpkin Patch collection.

Making the blocks is a simple matter, really. You begin with a 2.5″ square and add a 2.5″ border around it.

IMG_2696

Begin with a 2.5″ square, surrouned by a 2.5″ border. Center the square on the Wonky Log Cabin tool on the center square.

IMG_2697

Trim the right and left edges, using the #1 slots.

IMG_2698

Rotate the block 90Ā° and light up the cut edges with the blue lines on the tool, centering the square on the ruler on the center square of the block.

IMG_2699

Again, use the #1 slots to trim the right and left sides.

This gives you a square block, with the center square tilted to the right. (You may have noticed that some of the numbers appear backwards in the photo. The slots are numbered on the front and back, so you can use the tool right-side up or back-side up depending on which way you want your blocks to tilt.)

IMG_2702

Now you add another round of 2.5″ strips, and repeat the trimming sequence, using the #2 slots.

IMG_2700

There will always only be one edge that has two seams.

When you’re building this particular variation of the Log Cabin block, it’s easy to accidentally add your strip to the wrong edge. One rule I found is thatĀ  you want to always sew with the seams on top, and be sure you’re sewing across two seams each time you add a strip. There will always be only one edge that has two seams.

You will add a total of four rounds of strips to each block. After the final trimming, you will have a perfect 12.5″ Wonky Log Cabin block. The pattern includes instructions for several quilt sizes. I chose to make a lap quilt with 20 blocks, surrounded by a 6.5″ (6″ finished) border, using the traditional “Straight Furrows” setting.

Pumpkin Patch Title

My quilt finishes at 60″ x 72″.

Many of my fellow Island Batik Ambassadors went even wonkier and more whimsical than I did. You’ll enjoy checking out their blogs:

The “last hurrah” for the 2018 Island Batik Ambassadors is just beginning. You’ll have to wait for the last day to see what I did with my assigned Island Batik collection. If you check the Island Batik Facebook page, you’ll find the full “Getaway” Blog Hop Schedule.
Categories: Aurifil Threads, Hobbs Batting, Island Batik Ambassador, Island Batik Fabric, Quilts, Tools, Uncategorized | 3 Comments

Controlling the Chaos

“I can’t do it!”

I’ve heard it before, and not just from my quilting buddy, Vina.

In fact, I’ve said it myself, right here on this very blog.Ā  While many…maybe most…quilters can sew two random pieces of fabric together, and come up with a perfectly wonderful scrap quilt,Ā  many of us struggle to overcome an inner drive to make it somehow match.

In this case, Vina and I were making scrap blocks for a raffle quilt our guild is making for the local senior citizen’s center where we hold our meetings. The quilt we are making is on the cover of the Oct/Nov 2017 issue of American Patchwork and Quilting magazine. For the record, I did manage to make my blocks really random, as called for in the pattern.

My poor friend loved the quilt, but couldn’t bring herself to slap scraps together, so we came up with a compromise block. I like to keep stacks of 2.5″ squares by my machine and sew them into 4-patches as “leaders and enders,” so I always have a batch of 4.5″ 4-patches waiting to grow into a quilt.

IMG_2165
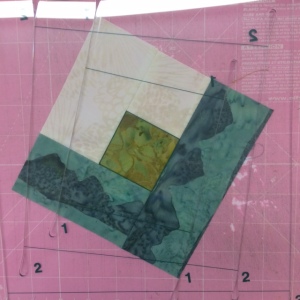
To make a 4 by 4-Patch block, you will need:

Eight pairs of medium 2.5″ print squares

Four 2.5″ x 4.5″ rectangles of a dark tone-on-tone print,

Twenty 2.5″ squares of a light print for the background. (I used two background prints, so I cut ten squares from each.)


IMG_2166
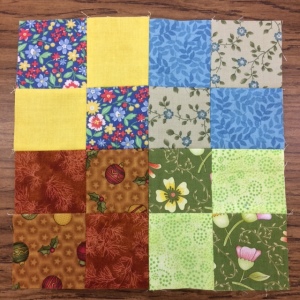
First, sew the medium print squares into 4-Patches and sew the 4-Patches into a Double 4-Patch.


Use the light squares and dark rectangles to IMG_2168make four flying geese, using the Stitch-and-Flip method.

Notice that because I was using two different light prints, two of my geese have print A on the right and print B on the left, and the other two have print B on the right and print A on the left.


IMG_2170
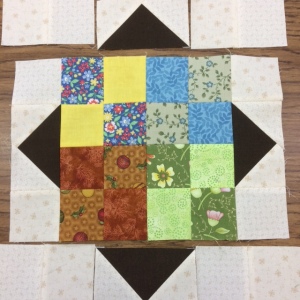
Sew a light square to both sides of two of the geese. Sew these to the sides of your double 4-patch.

Sew pairs of light squares to the other two geese. Sew these to the top and bottom of the double 4-patch.

Notice that, because I was using two light prints, I made sure that they alternated clear around the block.


So now we’ve turned a devil-may-care scrap block into one that is still scrappy, but a little more reserved about it.

I spotted this same block on Pinterest the other day, and that quiltmaker had taken the control one step farther.Ā  In each block in the quilt, medium and dark pieces were all one color…yellow in one block, orange in another. Red, blue, green, each assigned to their own blocks.

Ready to play, Thrifty Quilters? Grab your scraps and see what variation(s) you can come up with. Send your photos to: anne@sweetgrassdesigns.com .


Categories: 12" TQ Blocks, The Thrifty Quilter System, Thrifty Quilter Blocks & Patterns, Uncategorized | 2 Comments

A Wild Geese Christmas

It’s been my pleasure this month to contribute two 6″ quilt block patterns to the Moda Bake Shop’s “Countdown to Christmas” – Wrapped Up on December 17th, and today’s Christmas Eve post, Christmas Geese.

This is one of those blocks that looks a lot more complicated than it is, and the 12″ (finished size) version is totally TQable, which means it can be made entirely with self-made precut scraps from my Thrifty Quilter scrap system.

WGC Pieces
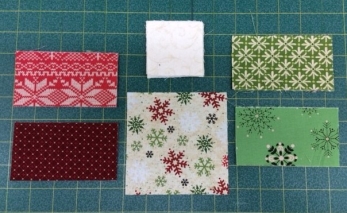
For each Wild Goose Chase block, you will need:

16Ā  2.5″ x 4.5″ rectangles. I used four sets of four matching rectangles.

32Ā  2.5″ x 2.5″ white squares

1Ā  4.5″ x 4.5″ print square. This may be a fussy-cut


WGC Step 1
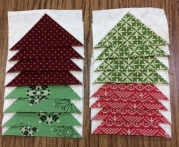
Step 1 is to make sixteen Flying Geese units, using the white squares and print rectangles. I used the same Stitch-n-Flip method as in the Moda Bake Shop post.


Ā FG Pairs
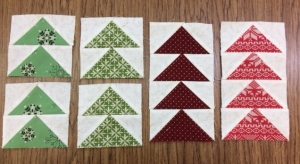
Step 2 is to sew the Flying Geese units together. I sewed my green geese into pairs, and sewed the red geese into strips of four.


Rows
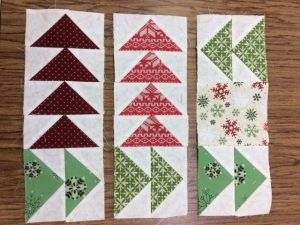
Step 3 is to sew three rows.


Wild Goose Chase
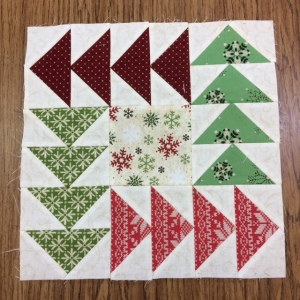
Step 4 is to sew the three rows together to complete your Wild Goose Chase block.

So you now have a 6″ version of this block, and a 12″ version.

If you want an even quicker quilt, use 3.5″ squares of white and 3.5″ x 6.5″ print rectangles to make your Flying Geese, and a 6.5″ center square, and you’ll have 18″ finished blocks!


So far, I have contributed two quilt “recipes” to the Moda Bake Shop: Big Sky and Stargazer . There are two more coming in January. Be watching for Snowbirds on January 4th, and Anne’s Windy Day Quilt, scheduled for January 20th.

Merry Christmas from Sweetgrass Creative Designs!

Categories: 12" TQ Blocks, Moda Bake Shop, The Thrifty Quilter System, Thrifty Quilter Blocks & Patterns, Uncategorized | 3 Comments

Create a free website or blog at WordPress.com.